
Under-Cabinet and In-Cabinet Lighting Guide
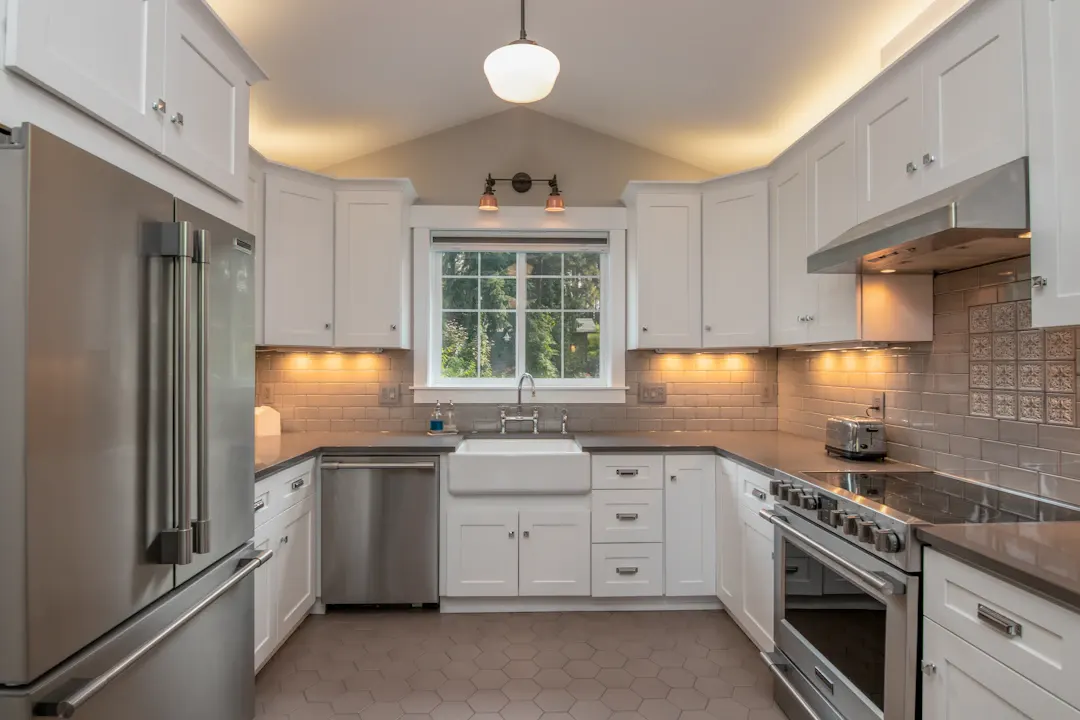
Kitchens and built-ins often look great in the showroom photo and then feel dim and shadowy once they are in your house. The ceiling cans light the floor, the upper cabinets throw a shadow over the counter, and anything behind a glass door disappears after sunset. Under-cabinet and in-cabinet lighting is how you fix that, and it works best when it is planned with the cabinetry instead of added later.
This guide is for Houston-area homeowners planning a new kitchen, a remodel, a bar, or living room built-ins who want to understand where cabinet lighting goes, how it is powered and controlled, and what it typically costs. It covers the planning side: placement, wiring routes, switching and how to keep it looking clean.
If you want a closer look at the fixtures themselves, such as LED tape versus puck lights and what color rendering means, see our companion post on under-cabinet lighting types explained.
Why Under-Cabinet and In-Cabinet Lighting Matters
Overhead lighting in most Houston kitchens comes from recessed cans in the ceiling. When you stand at the counter, your body blocks that light and the upper cabinets shade the back half of the countertop. That is exactly where you chop, read recipes and fill the coffee maker.
Lighting mounted under the upper cabinets fixes the shadow by putting light directly onto the work surface. Lighting inside cabinets serves a different purpose: it makes glass-front displays, open shelving, pantry interiors and deep drawers visible and usable.
Together, cabinet lighting delivers three practical benefits:
- Task light on counters, desks and bar tops where you work
- Visibility inside pantries, closets and deep cabinets so you can find things
- Accent light that shows off glassware, books or a hardwood interior, and doubles as a soft night light
Where to Put Cabinet Lighting, Room by Room
Not every cabinet needs lights. The best plans put light where it does real work.
| Location | Purpose | Typical fixture | Planning notes |
|---|---|---|---|
| Under kitchen uppers | Task light on counters | LED strip in channel | Mount toward the front edge to reduce glare on stone |
| Glass-front uppers | Display | Vertical strips or shelf-edge lighting | Use glass shelves so light reaches lower shelves |
| Open shelving | Accent and task | Strip under each shelf | Recess into the shelf so the source is hidden |
| Pantry or butler pantry | Visibility | Door-switched strips | Auto on/off when doors open |
| Deep drawers and pull-outs | Visibility | Motion or door-switch strips | Battery or low-voltage options |
| Home bar | Accent and task | Strip under uppers, lit glass display | Dimmer is worth adding |
| Bookcases and media walls | Accent | Vertical strips or shelf-edge | Keep color temperature consistent |
| Closets | Visibility | Strip along rods or inside towers | Motion sensors are convenient |
| Toe kick | Night light | Low-output strip | Subtle path lighting |
Kitchen
Under-cabinet strips along every run of uppers are the priority. Mount them near the front of the cabinet bottom, behind a small light rail, so the light washes the backsplash and countertop rather than reflecting straight into your eyes off polished quartz or granite. Where a run of uppers ends at a window, the lighting should stop cleanly, not leave a hot spot on the sill.
Display and glass cabinets
Lighting inside a glass-front cabinet works best with glass shelves, which let light from the top reach the lower shelves. Vertical strips along the inside face frame give even light from top to bottom. For solid wood shelves, a strip recessed into the front underside of each shelf lights the shelf below.
Pantries and closets
In a walk-in pantry or closet, the most useful lights are the ones that switch on automatically. Door jamb switches or motion sensors turn on strips as soon as you open the door. Our custom butler pantry cabinets and walk-in closet built-ins are often designed with these from the start.
Planning Wiring Before the Cabinets Are Built
The difference between lighting that looks built-in and lighting that looks added on usually comes down to wiring.
Power source
Cabinet lighting is usually low voltage, powered by a driver that converts household 120V to 12V or 24V DC. The driver needs a power source, which can be:
- A receptacle inside an upper cabinet or above the cabinets
- A hardwired junction box fed from a wall switch
- A dedicated circuit for larger installations
Hardwired connections and new circuits need a licensed electrician. In a remodel with open walls, it is the easiest time to add a junction box exactly where the driver will sit.
Driver location
Drivers produce some heat and need to be reachable for service. Common spots include inside a cabinet above the range hood vent area (away from heat), above the uppers if there is a gap below the soffit or ceiling, or in an adjacent pantry cabinet. They should never be sealed in a cavity with no airflow.
Wire paths
In our Houston shop we can drill small holes, route channels and leave chases in cabinet bottoms and sides before the finish goes on. That keeps wires invisible and protected. Retrofitting the same wiring after installation usually means surface-mounted raceways or exposed wire runs.
Light rails and channels
A light rail is a small strip of trim on the bottom front edge of the upper cabinets. It hides the strip from view when you are seated at an island or table. Aluminum channels with a frosted lens soften the light and help the LED strip shed heat.
Controls: Switches, Dimmers and Sensors
How you turn lights on matters almost as much as the lights themselves. Options include:
- Wall switch tied into the kitchen lighting plan, the most familiar choice
- Dimmer to drop under-cabinet light to a soft glow in the evening
- Door switches inside pantries, display cabinets and closets
- Motion sensors for drawers and toe kicks
- Smart controls that work with your home system or a phone app
Dimmers must match the driver type. Not every LED driver is dimmable, and mixing incompatible parts causes flicker or buzzing. This is a detail to settle during design, not after installation.
Common mistakes to avoid
A few problems show up again and again when cabinet lighting is planned in a hurry:
- Mounting the strip at the back of the cabinet bottom, which lights the backsplash but leaves the front of the counter dim
- Skipping the light rail, so the bare LED dots are visible from the breakfast table
- Mixing color temperatures between the ceiling cans, pendants and cabinet lights
- Running every zone on one switch, so you cannot leave a soft display light on without the full task lights
- Hiding the driver where nobody can reach it when it eventually needs replacement
Each of these is easy to avoid on paper and frustrating to fix once the backsplash tile is set.
Houston Conditions That Affect Cabinet Lighting
Our climate shapes a few choices. High humidity and condensation near sinks, coffee stations and range hoods mean connectors and drivers should be placed away from steam and splashes. Strips near a sink benefit from a sealed or coated LED tape rather than an open strip.
In coastal homes in Galveston and Brazoria counties, salt air can corrode bare metal connections over time. Sealed connectors and aluminum channels with end caps help. Summer attic heat also matters if drivers or wiring run above the cabinets into an unconditioned space, which we avoid whenever possible.
Older ranch homes from the 1950s through 1970s often have limited kitchen circuits. If you are adding lighting along with new appliances, it is worth having an electrician check capacity.
What Cabinet Lighting Typically Costs
Here are general planning ranges for Greater Houston. They vary with the number of runs, fixture quality, controls and how much electrical work is needed.
| Scope | General planning range |
|---|---|
| Under-cabinet strips for a modest kitchen, plug-in driver | $500 – $1,500 |
| Under-cabinet strips, full kitchen with dimmer, hardwired | $1,200 – $3,500 |
| In-cabinet display lighting, per cabinet | $200 – $600 |
| Pantry or closet with door switches | $400 – $1,500 |
| Full lighting package for kitchen, bar and built-ins | $3,000 – $7,000+ |
Electrician fees for new circuits or switch work are typically separate. A written estimate after an in-home consultation is the only figure to budget around.
How We Integrate Lighting Into Custom Cabinetry
Because we design, build and install in-house, lighting is part of the cabinet design from the first drawing. During the consultation we map where task light and accent light should go, then build channels, wire chases and driver space into the boxes in our shop. The same crew installs the cabinets and the lighting components and coordinates with your electrician for hardwired connections. You can see how this fits into our custom under- and over-cabinet lighting solutions and our broader lighting and accent features work.
For more on how light changes the way a kitchen or built-in feels day to day, read how lighting enhances custom cabinetry and daily use.
Light Your Cabinets the Right Way
Good under-cabinet and in-cabinet lighting puts light on the work, makes storage visible and keeps every wire and driver out of sight. The secret is planning it with the cabinetry, not after.
If you are planning a new kitchen, bar or built-in, schedule a free in-home estimate or call (281) 660-3903, Monday through Friday from 8am to 5pm. We will walk through lighting along with layout, materials and finish, and give you a written estimate.
Frequently asked questions
Should cabinet lighting be planned before the cabinets are built?
Do I need an electrician for under-cabinet lighting?
What color temperature works best in a kitchen?
Will in-cabinet lights make the cabinet hot?
Planning a project like this?
Get a free in-home estimate from the team that builds and installs the work.